
This article contains the following sections:
Import
A new Embrace environment is delivered by default without people (users), groups, contacts, and calendar events. These can be created via an external source (such as Entra ID), but even better is when users and groups are already imported at go-live. Besides the initial load at go-live, data can be imported in between, or when no directory is present.
Importing
Once the import file is formatted, it can be imported into Embrace. Click 'import file' and choose a type. In the next step, you can add the formatted Excel file. A check is also performed to see if the file has the correct format. If not, you may encounter various errors, which we explain under Troubleshooting.
The steps are as follows:
- Check if there are fields in the import file that are currently set to Read-only in Management > Social people > Profile editor and change this; you will receive a warning. When fields are set to Read-only, these fields from the import file are skipped. Don't forget to set the fields back after the import.
- Download a template file directly from Social management. Embrace adds fixed Excel templates here. If there are changes, the recent files will be shown here.
- Fill in the Excel file. Some fields are optional; an explanation per file type is at the bottom of this documentation in the tables under Import/export fields. Also see the next section Formatting the import file for the steps.
- Tip; if you are unsure what the fields in the template mean and what to fill in, first make an export of an existing group or contacts to get a good idea.
- When uploading, make sure to upload a file with the extension .xlsx.
- The screen indicates whether the file was uploaded correctly; click 'Next'.
- A preview of the import is shown; if approved, click 'Start importing'. You will see a message that it is in progress.
- You will receive a (mail) notification when the import is completed. In Social management > Dashboard, the download is available.
Formatting the import file
Follow the steps below to create a correct, working file.
- See the table Import/export fields at the bottom of this documentation which types of fields can be imported. The table also indicates which fields are mandatory.
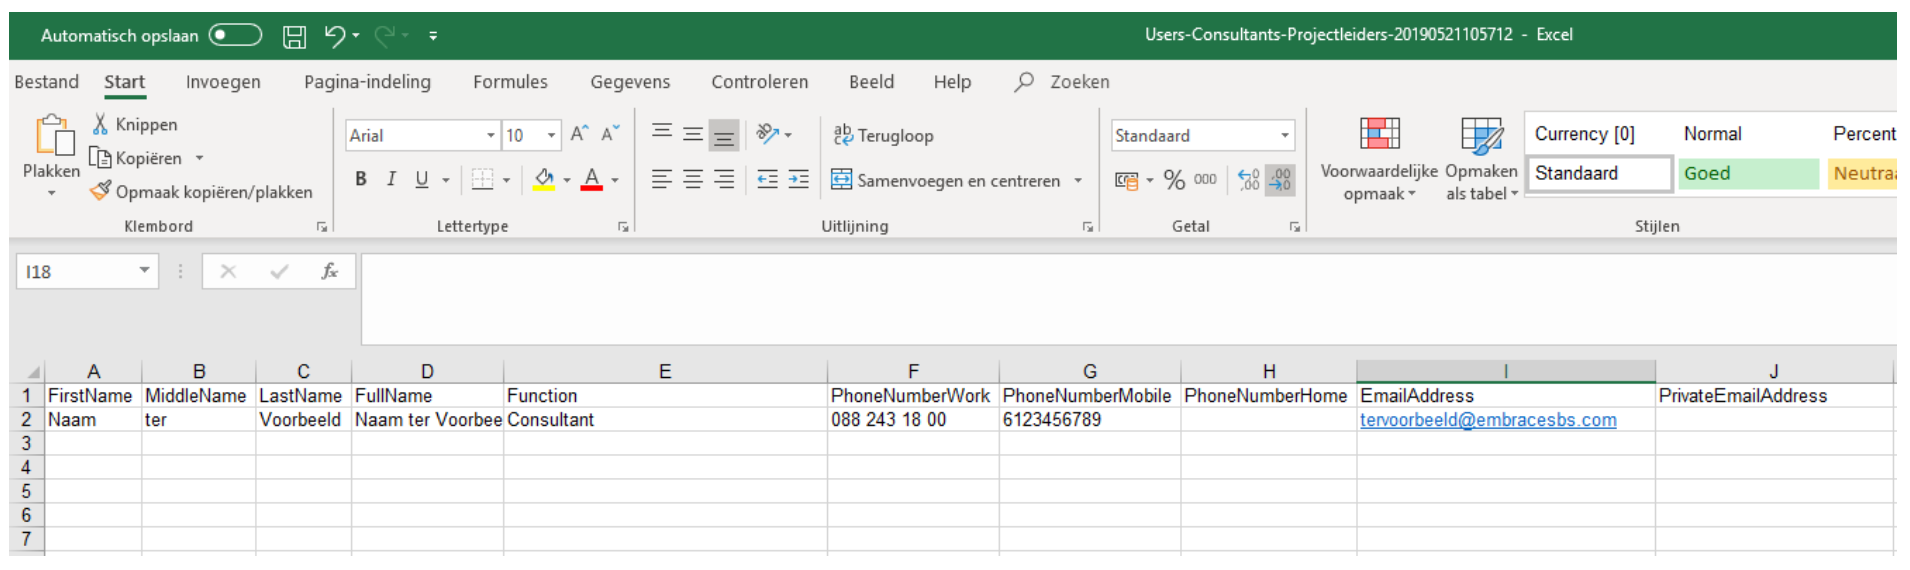
- Download the desired template file from Social management > Import & export > Import > Template file.
- Fill the document with the correct data in the correct columns.
- Have this document approved before import by the Security officer of your own organisation (GDPR compliance).
- Save the file; the file naming does not matter:
Adding members to a group via an import
By exporting an existing group, you see the current data of a group, such as name, title, description, managers, members, etc. You can use this export as a guide, but you cannot use it for an import action to add members.
If you want to add members via an import, use a blank template. You get the template from Management > Import & export > Template file. Choose 'Social groups'. Fill the template with the data from the export file made.
Name: fill in the title of the export file here, the name of the group as displayed in groups.
Description: Fill in the description, which is also in the export made. If you leave this blank, the description will be cleared.
Tags: If tags were present, include them in the template file.
Managers: Fill in all email addresses (comma-space separated) of the Group managers.
AddMembers: Fill in all email addresses (comma-space separated) of all members.
Troubleshooting
Possible issues that may occur:
- 'Next' button does not work after adding the file: -The file may be empty; no data is detected from row 2 onwards. -There may be missing permissions in your account; you have insufficient rights.
- Status remains stuck on 'undefined': -The back button 'back' was used, a new file was selected. Sometimes this does not work properly; refresh the screen and start again at step 1. -
- Status remains stuck on 'Pending validation': -A row contains an incorrect notation; an empty cell must really be empty. -A column name has an invalid name (check for typos).
- Users - Duplicate profiles: When Embrace (after import) is linked with an authentication system (Entra ID, Hello ID, etc.), duplicate user profiles may occur. This can happen with an inconsistent database.
- Users - Profile fields: Due to profile synchronization, certain user profile fields may be overwritten after import.
- Groups: If a user is not present within Social, an error occurs during import. This may be a typo or spelling mistake in the import file. You can avoid this by first exporting users from the existing database. You can then use this data when importing groups.
Export
Besides importing people, groups, contacts, or calendar events, it is also possible to export to an Excel file.
To do this, click Export > Export file. Choices are given in the dropdown; follow the steps. Then you can directly download the export from your notifications in Social, see the image below.
Import/export fields
People (Users)
| Field name in environment management / column name in Excel file | Description |
| FirstName | First name (required field) |
| LastName |
Last name including prefix (required field) Example: van den Berg |
| JobTitle | Job title |
| EmailAddress | Email address (required field) |
| PrivateEmailAddress | Email address (private) |
| PhoneNumberWork | Phone number (work) |
| PhoneNumberMobile | Phone number (mobile) |
| PhoneNumberHome | Phone number (home) |
| BirthDate | Date of birth |
| SetBirthDate |
Enter the value TRUE or FALSE in this column. If the value is TRUE, this field will also update if the above BirthDate is not filled in. If the value is FALSE, the current value will not be overwritten by import. |
| EmployeeSince | Employed since; this field can never have a future date. |
| SetEmployeeSince |
Enter the value TRUE or FALSE in this column. If the value is TRUE, this field will also update if the above EmployeeSince is not filled in. If the value is FALSE, the current value will not be overwritten by the import. |
| Organization | Organisation |
| Departments | Department(s); you can add multiple departments in this column separated by commas. |
| RoomNumber | Room number |
| OfficeName | Office location |
| Street | Address: Street |
| Number | Address: House number |
| PostalCode | Address: Postal code |
| City | Address: City |
| CountryCode | Address: Country code |
| PersonalSummary | Personal summary |
| ManagerEmailAdress | Email address of the manager of this person. |
| Skills | Skills / Knowledge |
| IsSuiteGuestUser |
External user; fill in this column with the value TRUE or FALSE. If the value is TRUE, the user is a guest user. If the value is FALSE, the user is not a guest user. |
| Language |
Set language; when it is a multi-language environment, the language for the user can be set during import. Language codes to fill in: NL EN DE |
| AddGroups | Add user to group(s); fill in the group name as shown in the export file. |
| RemoveGroups |
Remove user from group(s); fill in this column with the name of one or more groups (comma separated) from which the user should be removed. Use the group name as shown in the export file. |
| IsDeleted |
Archive user; fill in this column with the value TRUE or FALSE. If the value is TRUE, the user is archived. If the value is FALSE, the user is deactivated. |
| SendInvite |
Send invitation; fill in this column with TRUE or FALSE. If the value is TRUE, the user receives an invitation by email. If the value is FALSE, no invitation is sent. |
Fields that are displayed in the profile but cannot be populated via import are:
• Experience
• Education
Groups
In most cases, it is desirable to go live with a number of active groups (with members), so users do not log in to an empty environment. You can of course create a default group or manually create groups and add users, but you can also use a group import. This allows you to create multiple groups at once and add users in one go.
Note: to import groups with the desired users, a user import must first have been done. With this type of import, you cannot create new users.
| Field name in environment management / column name in Excel file | Description |
| Name | Name of the group |
| Description | A short description of the group; this will appear in the group description. |
| IsOpen | Open or closed group; fill in this column with TRUE or FALSE. |
| Managers | Group manager(s); fill in the email addresses of the group manager(s) here. If there are multiple, the email addresses must be listed separated by commas. |
| AddMembers | Group members; fill in all email addresses of users who should be added to the group here. The email addresses must be listed separated by commas. |
| RemoveMembers | Remove group members; fill in all email addresses of users who should be removed from the group here. The email addresses must be listed separated by commas. |
Contacts
| Field name in environment management / column name in Excel file | Description |
| Id | You do not need to fill in this field (only relevant for export). |
| Name | Name of contact |
| Type | Enter 1, 2 or 3 to add the correct label; |
| ParentContactId | The parent Id of the contact. Location X can, for example, fall under organisation Y. The Id of the organisation can be found by first exporting the contacts (see the above field Id). |
| IsExternalContact | TRUE or FALSE to fill in. |
| Website | Website (or intranet page) link, for example: |
| NavigationUrl | Google Maps (or other navigation app) link, for example: https://maps.app.goo.gl/bPUUDkLVNaNqkCdbA |
| PhoneNumber | Phone number 1 |
| PhoneNumber2 | Phone number 2 |
| EmailAddress | Email address |
| RoomNumber | Room number |
| Street | Address: Street |
| Number | Address: House number |
| PostalCode | Address: Postal code |
| City | Address: City |
| CountryCode | Address: Country code |
| Description | Contact description |
Calendar Events
| Field name in environment management / column name in Excel file | Description |
| Id | You do not need to fill in this field (only relevant for export). |
| StartTime | Start date. Example format: 2024-12-19 15:00:00. |
| EndTime | End date. Example format: 2024-12-19 15:00:00. |
| ClosingTime | Leave blank. |
| Title | Name of calendar event. |
| Description | Description of calendar event. |
| Location | Location of calendar event. |
| IsFullDay |
TRUE or FALSE to fill in. If TRUE, the event is marked as "full day". If FALSE, the event is not marked as "full day". |
| Url | Link to another URL. |
| Organizer | Email address of the Social user who should be marked as organizer. This user will then be shown as the organizer in Social. Only one user can be entered here. |
| Participants | Email address(es) of Social user(s) who should be marked as participant(s). These will then be shown as participants in Social. Multiple participants can be separated by commas. |
| BackUpList | Email address(es) of Social user(s) who should be marked as backup participants. These will then be shown as such in Social. Multiple participants can be separated by commas. |
| MemberLimit | Maximum number of participants. |
|
Team |
Name of linked group. |